
Work Experience
The GD Studio - (Aug 2023 - May 2025)
Below is a showcase of the games I have been a part of developing during my time at The GD Studio, including Diabotical Rogue - my first full release - as well as an unannounced project
DIABOTICAL ROGUE
Details:
Genre: Fast-Paced Rogue-lite FPS
Studio: The GD Studio
Engine: GLITCH Engine
Release Date: June 4th 2024
Role: Gameplay Programmer & Designer
Key Contributions:
Designed and implemented a modular skill system with multiplayer support
Developed core gameplay systems (weapons, abilities, passives, projectiles)
Built roguelike progression systems and game modes (Survival, Siege, etc.)
Managed multiplayer synchronization and handled edge cases like late joins
Created debug tools and systems for rapid iteration and playtesting
Optimized data pipelines and gameplay containers for scalability
UNRELEASED PROJECT

Details:
Genre: [REDACTED]
Studio: The GD Studio
Engine: GLITCH Engine
Release Date: Not Released
Role: Gameplay Programmer & Designer
Reach out if you want access to this page.
School Projects
The Game Assembly - (Aug 2021 - April 2024)
Below is a collection of projects I was a part of during my 2 year tenure at the school
GPU PARTICLE SYSTEM
Key Features:
GPU-side compute shaders for efficient particle movement and behavior simulation
Instanced rendering for optimizing particle rendering performance
Culling and sorting to ensure efficient use of resources when rendering large numbers of particles
Configurable particle system with adjustable parameters for spawn rate, lifetime, velocity, and more
Support for multiple emitters, collision detection, and dynamic updates in real time
Details:
Category: Engine Feature / Tech Demo
Timeframe: 4 Weeks
Team: Solo Project
Engine: Custom In-House Engine
SOLAR UPRISING
Details:
Genre: First-Person
Timeframe: 16 Weeks (20h/week)
Team: 5 Programmers, 5 Artists, 3 Designers
Engine: Custom In-House Engine
Key Contributions:
Designed and implemented a GPU-powered particle editor, supporting real-time editing and visualization of complex effects as part of my specialization
Integrated Nvidia PhysX into the engine, including a custom editor interface for configuring physics objects, materials, and collision layers
Contributed to overall engine architecture to support scalable and performant simulation features
SPITE: DIVINE DESCENT
Details:
Genre: Isometric Adventure
Timeframe: 12 weeks (20h/week)
Team: 5 Programmers, 5 Artists, 3 Designers
Engine: TGE (School In-House Engine)
Key Contributions:
Developed a custom VFX editor with support for mesh-based effects and emitter systems
Co-developed the entity-component system, optimized for cache-friendly memory layout
Implemented a full 3D collision system with support for spheres, AABBs, and OBBs, including layer-based filtering, debug visualization, and event-trigger callbacks
Authored and integrated shaders for visual effects and rendering pipelines
Created tools to import, export, and convert Unity levels into the custom engine format, streamlining level design workflows
VILSE
Details:
Genre: Isometric Adventure
Timeframe: 12 weeks (20h/week)
Team: 5 Programmers, 5 Artists, 3 Designers
Engine: TGE (School In-House Engine)
Key Contributions:
Designed and implemented a modular component system and object factory to streamline entity creation
Developed a camera editor for dynamic scene framing and designer control
Created systems for sprite sheet animations, destructible objects, and item pickups
Built tools for arena editing and scripted event triggers
Implemented checkpoint and spawning systems to support level progression
THE LICHS' GRIMOIRE
Details:
Genre: Mobile Puzzle Game
Timeframe: 6 Weeks (20h/week)
Team: 5 Programmers, 5 Artists, 2 Designers
Engine: Unity
Key Contributions:
Developed the player controller and implemented touch-based input systems for mobile platforms
Created interactive environmental mechanics, including portals, bridges, and chain logic systems that influence puzzle flow
Collaborated with designers to ensure smooth gameplay progression and responsive controls
Touched by a spectre
Details:
Genre: Shoot 'Em Up
Timeframe: 8 Weeks (20h/week)
Team: 5 Programmers, 4 Artists, 2 Designers
Engine: TGA 2D (School In-House Engine)
Key Contributions:
Implemented a variety of enemy behaviors, including movement, attack patterns, and interactions
Created a custom enemy scripting tool using Tiled2D, enabling designers to control spawn points, movement paths, bullet patterns, and wave timing
Streamlined the iteration process between programmers and designers by exposing key gameplay parameters in the editor
A BUGS' QUEST
Details:
Genre: 2D/3D Platformer
Timeframe: 8 Weeks (20h/week)
Team: 5 Programmers, 5 Artists, 3 Designers
Engine: TGE (School In-House Engine)
Key Contributions:
Implemented core UI systems, including health, checkpoints, and on-screen prompts
Built and maintained the game's component system for modular game object behavior
Developed tools to import/export levels from Unity, enabling efficient level iteration
Handled level loading, creation, and serialization for runtime and editor workflows
Implemented key gameplay systems, including checkpoints, destructibles, enemies, and obstacles
Frenemies
Details:
Genre: Party game
Timeframe: 8 weeks (20h/week)
Team: 5 Programmers, 5 Artists, 3 Designers
Engine: Unreal Engine
Key Contributions:
Design and implementation of several mini-games
Design and implementation of several items
Player controller & input
Diabotical Rogue
(Dec 2023 - June 2024)
Diabotical Rogue was a fast-paced, team-driven project that I was part of from inception to release. As one of six gameplay programmers, I played a central role in both designing and implementing a wide range of features and systems. With a rapid and productive workflow, we delivered a tightly tuned roguelike experience with competitive multiplayer elements.On this page, I’ll showcase a selection of the features and systems I contributed to, from under-the-hood architecture to surface-level implementations of skills and mechanics.
Major Contributions:
Designing and balancing the core game loop and various game modes
Implementing unique skills, movement behaviors, and weapon mechanics
Developing modular systems for weapons, upgrades, and roguelike choices
Creating and tuning systems for in-game rewards and meta-progression
Ensuring a responsive, fair gameplay experience in networked multiplayer scenarios
Maintaining and improving the game post-launch with ongoing bug fixes, performance optimizations, and gameplay adjustments based on community feedback
Hookshot Design Overview
The Hookshot was a central ability for the Scout class in Diabotical Rogue, a highly mobile, high-damage character with low survivability. Designed for both precision control and expressive movement, the Hookshot allowed players to make sharp combat repositions or pull off dramatic plays across the map.To support a range of playstyles, it was also tightly integrated with the game's roguelike upgrade system, giving players the tools to specialize and expand the Hookshot’s functionality mid-run.
Basic Hookshot – Core Functionality
In its base form, the Hookshot allows the Scout to quickly zip toward any hookable surface, combining controlled movement with a burst of momentum. This enabled players to dodge, reposition, or chase enemies fluidly in the middle of combat.From a design standpoint, it was important to preserve a responsive and predictable feel, so players could use it with confidence in competitive scenarios. At the same time, it was tuned to maintain enough physicality to feel skillful and satisfying—rewarding timing and precision.
Swing Hook – Advanced Movement
With the Swing Hook upgrade, players could convert the Hookshot into a momentum-based traversal tool. Instead of pulling directly to the target point, it acts more like a grapple, allowing for arcing swings, speed builds, and creative traversal across the map.This variant opened up alternative movement routes, letting players flank, reposition, or navigate otherwise inaccessible areas. It encouraged experimentation and gave high-skill players an expressive tool for mastering map mobility.Designing this upgrade meant carefully managing momentum, gravity influence, and release behavior, so it felt powerful but never out of control. It became a fan-favorite tool for making stylish and strategic plays.
Player Hook – High Risk High Reward
The Player Hook upgrade turned the Hookshot into a direct offensive tool. Instead of hooking to surfaces, players could latch onto enemies, pulling themselves in aggressively or even displacing opponents with enough force to throw them off the map.This created new dynamics in one-on-one duels and allowed skilled Scouts to control spacing, initiate fights, or interrupt enemy plays. It added a layer of risk-reward: closing distance quickly came at the cost of positioning, but could completely shift the tide of an encounter if used well. It was of course not for everyone as landing a good hit required a great deal of accuracy, making it the perfect tool for those wanting to show off.Implementing this feature meant handling complex interactions like hit detection, player collision states, and syncing animations across clients, especially in fast-paced networked environments.
Final Thoughts
The Hookshot became one of the most central and versatile abilities in Diabotical Rogue. It offered both depth and accessibility, feeling immediately useful while rewarding deeper mastery. It also served as a showcase of our design philosophy: giving players tools that scale with their creativity and skill, while maintaining a fair and competitive balance.
Skill System
The skill system was designed to empower rapid iteration and expressive design in a co-op roguelite context. The goal was to allow content creators, who in this studio act as both designers and programmers, to define new skills entirely through scripting, while abstracting away boilerplate and networking concerns.This was achieved by creating a declarative, data-driven C++ system where each skill is represented by a registered script ID tied to logic through a callback architecture. The system handles core logic such as damage, effects, targeting, and animation triggers, while exposing high-level hooks for customization. It also integrates tightly with a bespoke event-based networking layer, enabling server-authoritative multiplayer behavior with minimal overhead for the script author.
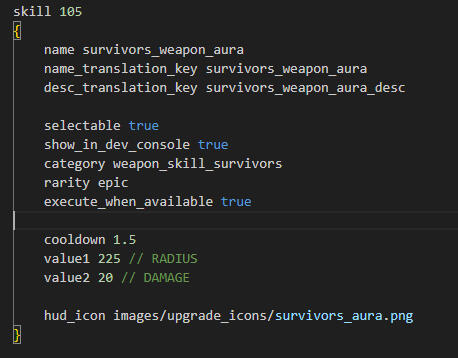
Skill Definition & Data Binding
Skills are defined using raw script data and assigned a unique ID. This ID maps directly to a constant in a header file within the codebase, linking data to logic cleanly.Each definition contains metadata (like rarity, category), functional values (damage, cooldown), and optional visuals (e.g., HUD icon). These scripts are lightweight, readable, and version-control friendly.
Skill Definition in script

Predefined Skill IDs


Augment Definition
Upgrade Call

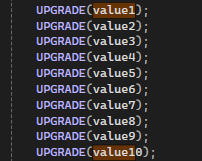
Reading values from the skill state


Upgrading and reading
Skills support runtime upgrades through augment entries. Each augment modifies the base skill definition using operations like:
Preadd: Add before multiplier
Multiply: Apply scaling
Postadd: Add after multiplier
Overwrite: Replace value directly
When an upgrade is applied, a recalculation occurs. The results are stored in a computed definition on the agent's skill state, ensuring real-time updates without changing code.This system makes it easy to prototype and tweak values without recompilation.
Networking
Skill events are synced over the network using structured messages (msgSkillEvent). Handlers subscribe to these messages to execute logic on send and receive.For example, when a skill is activated on the client, an event is serialized and sent to the server, where it's processed and replicated. This ensures consistent behavior across all clients.

Registration of callbacks

Sending a message to the server

Handling the message on server


Final Notes
This system prioritizes fast iteration and content scalability, allowing the team to script dozens of unique skills with minimal boilerplate.
By integrating deeply with the custom event callback system and message-passing network architecture, it ensures tight control over behavior and synchronization without burdening the skill author with low-level logic.
The categorization and ID system future-proofs the content pipeline and enables tracking, serialization, and debugging at scale.
SPECIALISATION: GPU PARTICLES
Introduction
Why Particles?
During my sixth game project at school, I was unexpectedly tasked with implementing a VFX editor for our graphical artists, despite having no prior experience in this area. Although time was limited, I found the work enjoyable and satisfying, particularly due to the visual feedback created by the effects. However, I didn’t have the opportunity to fully explore particle simulation during that project. To deepen my knowledge, I chose to specialize in this area, dedicating more time to mastering it.
Goal and purpose
To challenge myself further, I aimed to optimize the editor to handle millions of particles simultaneously. The best way to achieve this was by moving the simulation to the GPU, which also gave me an excellent opportunity to learn about compute shaders and GPU debugging. Besides performance, I wanted the editor to remain user-friendly and versatile, allowing a variety of effects to be created easily. In summary, my main objective was to create a particle editor capable of stable FPS with millions of particles, while still being accessible and powerful.
Implementation
Why Compute Shaders?
My entry point for this project was to not only make a particle editor, but to make a particle editor with support for massive amounts. And as I had been told, there was only one way, as of now, to achieve this; Compute Shaders.Previous to this, I had almost never heard of Compute Shaders, much less how they work. So you could say this was unknown territory for me. And who knows, it might be for you as well? So let me quickly explain how a compute shader works, and its benefits, in a way that even I would have understood.A compute shader is basically a shader that performs general computation on any arbitrary data you would like, but on the GPU instead of the CPU. And why is this a big deal? Well to put it simply, it is due to the graphics cards optimisation for parallel processing. The ability to process millions of tasks in parallel significantly reduces time and resources needed for computationally intensive tasks.This, of course, made compute shaders a very good fit for my goal of simulating particles on a massive scale, since I wanted to be able to have as many as possible without negatively impacting performance.
Structure
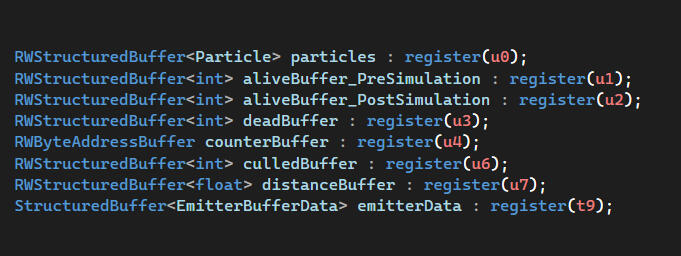
The only data that existed on the CPU was the emitter properties, which then was passed to the GPU through a structured buffer. For every emitter I would run a separate compute pass consisting of the following shaders:
Start
◆ Calculate thread counts for emit/simulate shaders
◆ Update counters save alive particles from last frameEmit
◆ Emit the requested amount of particles
◆ Add To Alive list, remove from dead listSimulate
◆ Perform calculations per particle
◆ Cull irrelevant particles
◆ Write expired particles to dead list/remove from alive listSort (Didn’t fully integrate)
◆ Sort particles based on depth using a bitonic sort algorithmCleanup
◆ Store post-culling alive amount as instance count in draw buffer, which will then be used for instanced rendering
Other optimizations included a fixed-size memory pool to avoid reallocations, managed on the GPU with index buffers for dead and alive particles, instanced rendering, indirect buffer arguments to avoid CPU-GPU transfers, and culling techniques such as frustum and distance culling.
Performance
To stress test the system, I decided on three million particles. Initially, I got around 60 fps, with a few drops here and there. The main reason for dropping this low seemed to be the GPU stalling unexpectedly. After some debugging I identified one probable cause.
Issue
The emitter buffer, allowed for CPU write access which I would have liked to avoid since this can lead to resource contention and stalls if both the CPU and GPU try to operate on the buffer simultaneously.
Solution
To fix this, I had to rethink how I was supposed to update the buffer without allowing CPU access. The solution I came up with was to utilize a staging buffer. These are buffers optimized for the sole purpose of communicating with the CPU, and as such, it would make perfect sense to make use of this.So, to properly update the emitter buffer, I made sure to have a staging buffer with the exact same size and structure as the emitter buffer, which was first written to by the CPU with the new values. I then copied this staging buffer to the emitter buffer on the GPU, effectively updating it without direct CPU-GPU access. An extra perk of this is that this allowed copying the data to the GPU using an asynchronous transfer, which basically meant that this step took place entirely independently from the CPU, not causing any stalls in the process.
Result
After addressing this, my frame rate became much more stable and managed to stay between 70-100 fps, depending on how many particles were being culled. Before the fix, the frame rate would not go above 60 fps even with all particles culled (all simulation, no rendering). But after the fix, I kept a stable frame rate above 100 fps, and it would only drop to about 70-80 fps with all particles on screen. This basically meant that the biggest area for improving performance was now the rendering, and not the compute pass.
Ease Of Use
My second goal with this project was that almost anyone (with at least a basic understanding) would be able to create effects easily with my editor. Therefore i tried to keep the complexity on face level as low as possible, to ensure that it was easily comprehensible.Over the course of the project, I would say that this got a bit overlooked at times due to other areas taking priority. In spite of this I feel like the finished product turned out all right.You can see the some example videos of how to use the editor in the showcase at the bottom of the page.
Features
Depth Collisions
Another perk of simulating on the GPU is that it grants convenient access to the depth buffer. This enables me to compare the depth of each particle with the depth values of the background from the preceding frame. If the particle's depth exceeds that of the background, I simply modify the particle's velocity vector by reflecting it, leading to a collision behavior that is both effortless to compute and straightforward.The modified velocity vector is then adjusted by multiplying it with a customizable restitution value, which controls the level of elasticity of the particles.
Animated Sprite Sheets
I enabled the ability to animate sprite sheets for particles either with frames per second or over the particle's lifetime.
Emitting From Shapes
To make a bigger range of effects possible I added a few different emitter shapes, such as boxes, spheres and cones.In addition to this I added the option of emitting from the center point, volume or shell.
Simple Physics
To make particles behave more realistic, I implemented some simple physics such as force, mass and gravity.
Movement Noise
I added the ability to add noise to the movement to create some exciting effects. This was modifiable separately for each axis to make it easy to produce the wanted behaviour.
Properties Over Time
I would have liked to implement more advanced behaviours such as modifiable curves over lifetime, but due to the main priority being optimisation and accessability, I had to settle for linear interpolations for over lifetime instead. Properties open for this was scaling, color, alpha and intensity, which still allowed for some cool looking effects.
Trails
Another addition was the spawn rate over distance. This made it possible to make some interesting effects such as trails, by emitting particles based on distance traveled. And to make sure the particles would spawn consistently, no matter the frame rate, I interpolated the spawn positions of the particle between the emitters current and previous position.
Soft Particles
To make effects like gas, fire and smoke more realistic, I implemented a simple fade both towards the already rendered background, to avoid clipping, as well as a fade towards the camera to improve visibility.
Closing Thoughts
Obstacles Along The Way
One of the biggest challenges of this project (at least initially) was debugging my code, since so much of it took place on the GPU. This led to me spending countless of hours in programs like RenderDoc, tearing my hair over some buffer not being written to correctly.
What I Have Learned
I have gotten more familiar with debugging the GPU using third party software like RenderDoc and Nvidia Nsight. Though a struggle at first, they proved to be an invaluable resource for me, trying to find my way around all the shaders, pixels and buffers.I have also gained a valuable understanding of GPU Parallel Computing and the power it possesses. The possibility of simulating millions of particles without significant performance issues, is to me, quite extraordinary. And I am pleased that I managed to achieve this, even if I would have liked to do even more.
Moving Forward
Had I continued with this project, there are definitely things I would like to improve.My first cause of action would be to further polish the editor to make is as user-friendly as possible. Restructuring it and writing custom tool tips guiding the user through the process.I would also like to extend my feature library to include things like emitting from meshes, force fields, and custom property curves.Performance wise there is still some work to be done, such as switching to tiled rendering instead of rasterization, which would let me draw the particles in parallel, allowing for a further performance boost.
Editor Showcase
Physics and Depth Collision
Creating a particle system
Properties Over Time
Textures & Sprite Sheets

William Ask
Gameplay Programmer & Designer
Hi, I'm William Ask — a game developer with a simple goal: to make great games and have fun doing it.Gaming has been a lifelong passion of mine, and after stepping into the industry, I’ve never looked back. I’m excited for whatever the future holds.As a person, I strive to stay positive, approachable, and always wear a smile. I believe that enjoying the work process leads to better collaboration and, ultimately, a better product. I’m always open to giving and receiving constructive feedback — not only because it improves the game, but because it helps us grow as individuals and developers. While I'm still early in my career, I believe a fresh perspective can be a strength.As a team member, I bring a strong work ethic, a solution-oriented mindset, and a focus on shared goals. I view challenges as opportunities to grow and believe the best outcomes come from clear communication, collaboration, and mutual support.At The GD Studio, I’ve had the chance to be part of my first full game release — from concept to launch. These nearly two years have been incredibly rewarding, giving me firsthand experience of what it takes to turn an idea into a finished product.This site is a showcase of the projects I’ve contributed to — both during my time at The Game Assembly and at The GD Studio. I hope you find it interesting, and I’d love to hear from you. Feel free to reach out with any questions!